Celebrating Valentine’s Day Today
February has rolled around again, and Valentine’s Day is near. Many of us use this time to create or buy something special for those who are important to us. Cards, candy, and flowers especially! The United States hasn’t always celebrated Valentine’s Day and there has been some debate as to the origins of this modern-day holiday.
Many scholars attribute the name Valentine’s Day to a Roman priest named Valentine. Roman Emperor Claudius II felt that married men made bad soldiers and forbade those in his army to marry. Valentine felt this was an unjust ruling, so he married couples in secret. When Emperor Claudius II found out, he had the priest thrown in jail and killed. The legend continues that while in jail, before he was killed, Valentine fell in love with the daughter of one of the jailers, and prior to his death he sent her a love note saying, “from your Valentine.” There are various other holidays that were celebrated long ago during the month of February that have been associated with Valentine’s Day including a pagan Roman holiday called Lupercalia. At the end of the 5th century, the Catholic Church banned Lupercalia and named February 14th St. Valentine’s Day, however love sentiments were not exchanged as a part of that date for some time. Great Britain was probably the first country to celebrate our modern Valentine’s Day, exchanging cards and letters in the early 1700’s. Today Valentine’s Day celebrated in the US, Canada, Mexico, the United Kingdom, France and Australia.
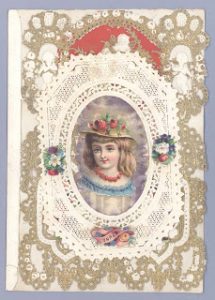 Our current practice of exchanging cards and gifts in the US can probably be traced to a woman named Esther A. Howland, and a man from Great Britain named Richard Cadbury. Howland began selling the first mass produced Valentine’s Day cards in America. She used real lace, ribbons and colorful pictures called ‘scrap’ in her cards and placed messages of love inside. She is known as the ‘Mother of the Valentine.’ Cadbury came up with the idea of selling bite-sized chocolates packaged in heart shaped boxes. Candy and cards remain the biggest Valentine’s Day gifts to this day.
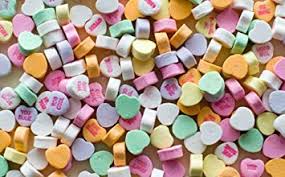
 Our other favorite Valentine candy, the candy hearts, were made in the early 1900’s. Made by a company called Necco in Massachusetts, candy hearts have evolved from fairly large heart shaped candies with longer sayings like, “Married in White, you have chosen right” to the small candies we are familiar with today. With less space, the sayings had to become shorter as well to things like “Miss You” or “Love U.”
 However you celebrate Valentine’s Day, we can all agree that a day devoted to expressing our love for one another can only be a good thing. I have included some of my favorite valentines crafts for you to try with your family, or to make that special card for your loved one.
CRAFT 1: MARBLED HEARTS
There is something special about making marbled art. It’s a favorite with kids of all ages because they get to get their hands messy while making the art. It’s a favorite with mom’s because it’s a fairly easy craft to setup with beautiful results! I use shaving cream – make sure to purchase a can of foam NOT GEL shaving cream. Here are the instructions:
- SUPPLIES
-
-
- 1 can of foam shaving cream.
- 8 x 11 Card stock white paper
- Colored card stock paper (if you want)
- Food coloring or liquid water color paint (I used food coloring)
- Butter Knife or scraper
- Skewer or chopstick
- Nice sized casserole/cake dish ( 9 x 14 or 9 x 16)
-
- INSTRUCTIONS
-
- Fold one sheet of your card stock paper in half to make a folding card. On the cover, draw a heart and cut it out. This is your heart template. You want to make sure it will fit onto the cover of a standard 8 x 11 card or whatever sized card you want to end up with. Trace the heart shape onto more card stock as for as many cards as you want to make.
- Cut out the hearts. This is a great thing to have the kids doing while you prepare the shaving cream!
- Lay a bunch of newspaper around the table you are using as the food coloring will stain if that is what you are using! Fill half the dish with shaving cream.
- Using the food coloring, drop 3 drops of each color you want about 2” apart from each other. Remember these will blend so be mindful of what colors you want to end up with!
- Using the skewer or chopstick, gently swirl the dye. DON’T OVER MIX! You want distinct colors!
- Get your heart shape and place the paper onto the colored shaving cream. Just lay it on top and then lift it up. We found the color stayed on the card better if we left the shaving cream on the heart for a minute or so.
- When ready, get the butter knife or scraper, and scrape off the shaving cream from the heart shape. This will leave the color on the card in neat marbled designs.
- Let your hearts dry for a day and then glue them onto the front of your card. For added fun, paste your marbled heart onto a piece of contrasting card stock and then place on the front of your card. I like putting ours on black to make the marbling really pop!
- Write your Valentine’s message on the inside and deliver!
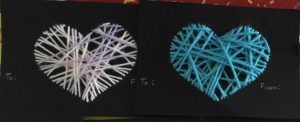
CRAFT 2: THREAD HEARTS
I found this on Pinterest and had a lot of fun. It was a bit more time consuming than I expected but the results are pretty cool. This is also a great way to get rid of any left over embossing thread or yarn you haven’t used.
- SUPPLIES
-
-
- Card stock (8x 11 or whatever size you want the cards to be)
- Embroidery floss or yarn of whatever color you like.
- An embroidery or yarn needle
- A pencil
-
- INSTRUCTIONS
-
- Lightly draw a heart in the size you want on the cardstock. A fatter rounder heart works better than a skinny one.
- Using the needle, poke holes along the line of the heart you drew, placing a few millimeters between each hole you poke with the needle. If children are going to be doing this, make the spaces a bit farther apart. For older kids, place them closer together. Do this all around the heart you have drawn till it is perforated all along the outline of the heart.
- Thread your needle with your embroidery floss or yarn making a knot at the end.
- Using the threaded needle, start at one end of the heart placing the needle through one of the holes you made earlier. Span the heart, taking care not to cover the ‘V’ of the heart. I found that when re-entering the heart, use a near-by hole so that you are not threading the back of the heart, only the front.
- Keep crossing the heart – back and forth until all the holes you made around the heart have been used. Then tie off the thread on the back of the card. This makes a great card to write a simple note onto.